How to Create VLANs with MikroTik — The Proper Way (Bridge VLAN Filtering)

In a previous post I covered the easy way to create VLANs on MikroTik — one bridge per VLAN. It works, it’s great for learning, but it doesn’t scale well and it’s heavier on the CPU than it needs to be. If you haven’t read it, you can find it here.

This post covers the proper way: bridge VLAN filtering. One bridge, one VLAN table, everything in one place. Understanding the easy way first makes this much easier to appreciate — but you don’t need it to follow along.

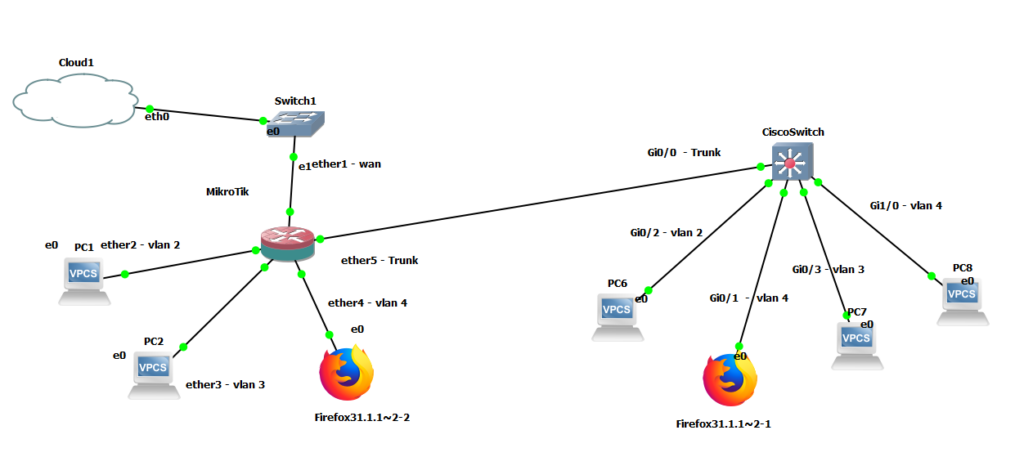
The topology is the same as in the previous post: a MikroTik router connected to a Cisco switch via a trunk port, three VLANs, devices on each VLAN getting DHCP and internet access.


How Bridge VLAN Filtering Works

Instead of creating a separate bridge for each VLAN, we create a single bridge and enable VLAN filtering on it. The bridge then maintains a VLAN table that controls which ports carry which VLANs — tagged (trunk) or untagged (access).

The key concepts:

  • Tagged ports carry traffic for multiple VLANs with 802.1Q tags. Your uplink to a switch or another router is typically tagged.
  • Untagged ports carry traffic for a single VLAN with no tag. Your end devices (PCs, printers, APs) connect to untagged ports.
  • PVID (Port VLAN ID) is the default VLAN assigned to untagged traffic arriving on a port. When a frame arrives without a tag, the bridge stamps it with the PVID before processing it.

This model maps closely to how Cisco switches think about VLANs — trunk ports and access ports — which may feel more familiar.


Step 1 — Create the Bridge

/interface bridge
add name=bridge-vlans

We create the bridge first without enabling VLAN filtering yet. We’ll turn that on after the VLAN table is fully configured — enabling it on an empty table drops all traffic immediately.


Step 2 — Add Ports to the Bridge

Add your trunk port (uplink to the switch) and your access ports (connected to end devices).

/interface bridge port
add bridge=bridge-vlans interface=ether5 pvid=1
add bridge=bridge-vlans interface=ether2 pvid=2
add bridge=bridge-vlans interface=ether3 pvid=3
add bridge=bridge-vlans interface=ether4 pvid=4
  • ether5 is the trunk port to the Cisco switch — PVID 1 is fine here since tagged traffic will override it
  • ether2, ether3, ether4 are access ports — PVID tells the bridge which VLAN to assign untagged frames arriving on each port

Step 3 — Configure the VLAN Table

This is where you define which VLANs are allowed on which ports, and whether each port carries them tagged or untagged.

/interface bridge vlan
add bridge=bridge-vlans vlan-ids=2 tagged=ether5,bridge-vlans untagged=ether2
add bridge=bridge-vlans vlan-ids=3 tagged=ether5,bridge-vlans untagged=ether3
add bridge=bridge-vlans vlan-ids=4 tagged=ether5,bridge-vlans untagged=ether4

Breaking this down:

  • VLAN 2 is carried tagged on ether5 (the trunk to the switch) and on bridge-vlans itself (so the router can route it), and untagged on ether2 (the access port for VLAN 2 devices)
  • Same pattern for VLANs 3 and 4

Step 4 — Enable VLAN Filtering

Now that the VLAN table is in place, it’s safe to enable filtering. The bridge will start enforcing the table immediately.

/interface bridge
set bridge-vlans vlan-filtering=yes

Step 5 — Create VLAN Interfaces for Routing

To route between VLANs and assign IP addresses, we need VLAN interfaces attached to the bridge.

/interface vlan
add interface=bridge-vlans name=vlan2 vlan-id=2
add interface=bridge-vlans name=vlan3 vlan-id=3
add interface=bridge-vlans name=vlan4 vlan-id=4

Step 6 — Assign IPs, DHCP, and NAT

This part is identical to the easy way — the IP addressing, DHCP, and NAT configuration doesn’t change, only the interfaces you assign them to.

/ip address
add address=10.0.2.1/24 interface=vlan2 network=10.0.2.0
add address=10.0.3.1/24 interface=vlan3 network=10.0.3.0
add address=10.0.4.1/24 interface=vlan4 network=10.0.4.0

/ip pool
add name=dhcp_pool0 ranges=10.0.2.2-10.0.2.254
add name=dhcp_pool1 ranges=10.0.3.2-10.0.3.254
add name=dhcp_pool2 ranges=10.0.4.2-10.0.4.254

/ip dhcp-server
add address-pool=dhcp_pool0 disabled=no interface=vlan2 name=dhcp1
add address-pool=dhcp_pool1 disabled=no interface=vlan3 name=dhcp2
add address-pool=dhcp_pool2 disabled=no interface=vlan4 name=dhcp3

/ip dhcp-client
add disabled=no interface=ether1

/ip dhcp-server network
add address=10.0.2.0/24 dns-server=10.0.2.1 gateway=10.0.2.1
add address=10.0.3.0/24 dns-server=10.0.3.1 gateway=10.0.3.1
add address=10.0.4.0/24 dns-server=10.0.4.1 gateway=10.0.4.1

/ip dns
set allow-remote-requests=yes

/ip firewall nat
add action=masquerade chain=srcnat

Easy Way vs. Proper Way — At a Glance

Easy WayBridge VLAN Filtering
Bridges neededOne per VLAN + one trunkOne total
Interface list sizeGrows fastClean and minimal
Adding a new VLAN3+ commands, new bridge2 commands
CPU usageHigher (software per bridge)Lower (single bridge path)
Switch chip offloadNoYes (on supported hardware)
TroubleshootingMultiple bridges to checkOne VLAN table to check
Good for learningAfter you know the basics
Good for production

A Few Things Worth Knowing

PVID must match the VLAN table. If a port’s PVID doesn’t have a corresponding untagged entry in the VLAN table, untagged frames arriving on that port will be dropped. Double-check both match — it’s the most common source of “why isn’t this device getting an IP” confusion.

The bridge itself must be tagged in the VLAN table for routing to work. That’s what the bridge-vlans entries in Step 3 are for. If you forget this, inter-VLAN routing fails silently — devices get DHCP but can’t reach other VLANs or the internet.

This configuration assumes a clean slate. If you’re adapting this to an existing bridge that already has ports and traffic, take care — enabling VLAN filtering mid-session will drop everything that isn’t covered by the VLAN table. Test in a lab or during a maintenance window.


Final Thoughts

Once you’ve done it a few times, bridge VLAN filtering is actually simpler to manage than the easy way — there’s just less of everything. The learning curve is the VLAN table concept, which takes a bit of getting used to if you’re new to it.

If Part 1 got your VLANs working and you understand why each piece is there, you’re ready for this. The configuration is a bit more deliberate, but the payoff in cleanliness and efficiency is worth it.
Why You Should Be Running a Homelab

It’s not just a hobby. It’s the best IT training program money can’t buy.


If you work in IT, or you’re thinking about getting into it, someone has probably told you to “get a homelab.” Maybe you nodded and moved on, thinking it sounded like a lot of effort for something you’d use twice. I get it. But I’m here to make the case that a homelab is one of the most valuable things you can invest in — not just for learning, but for your career, your wallet, and your daily life at home.

I’ve been running mine for years. It started small and has grown into a three-node Proxmox cluster, a full self-hosted services stack, a home NVR system, and the foundation for a serious side income. None of that happened overnight, but all of it started with the same thing: a spare machine and a willingness to break things.

And you don’t need to start big. A Lenovo mini PC or an HP EliteDesk — 8th generation or newer — can be found used for very little money. They’re compact, power-efficient, and more than capable of running a real homelab. One of those machines, set up properly, will put you on a path of professional growth that no certification alone can replicate.

Here’s why you should do the same.


You Learn by Breaking Things, Not Reading About Them

There is no certification, no course, and no amount of documentation that teaches you the way a 2am crash does.

When my backup script left a stale NFS mount that froze an entire server for 76 minutes, I learned more about how the Linux kernel handles NFS retries than I ever would have from a book. When my network card started crashing overnight and I discovered that ICMP keeps responding even during a TX queue hang — completely defeating ping-based monitoring — that’s the kind of nuance that only comes from real experience.

But it goes well beyond server crashes. Running a homelab naturally pulls you into territory you wouldn’t otherwise explore:

  • You start setting up a firewall and end up understanding stateful packet inspection, connection tracking, and why rule order matters.
  • You want remote access, so you run your own VPN server — and suddenly WireGuard, certificates, and key management aren’t abstract concepts anymore.
  • You have IoT devices you don’t fully trust, so you learn about VLANs and network segmentation to keep them isolated from the rest of your network.
  • You deploy a few services and realize you need proper DNS — and then you’re deep into split-horizon DNS, local resolvers, and why you should never rely on your ISP’s nameservers.
  • You want HTTPS on your internal services, so you learn about TLS certificates, Let’s Encrypt, DNS challenges, and wildcard certs.
  • You spend enough time in the terminal that Linux stops being intimidating — and one day you realize you’ve made the switch from Windows entirely, not because you forced it, but because it just started making more sense.

Every failure in a homelab is a controlled failure. Nothing is on fire. No customer is affected. No boss is watching. You have the freedom to dig deep, understand what actually went wrong, and fix it properly. That knowledge sticks in a way that reading never does.


It Directly Benefits Your Career

I’m not going to name my employer, but I’ll tell you this: the skills I’ve built in my homelab have made me measurably better at my job. Troubleshooting approaches, understanding how systems fail, knowing what questions to ask — all of it comes from hours spent in my own environment where I had no one to call and no escalation path.

The homelab is also where I stay sharp on technologies I don’t use daily at work. Kubernetes, Ansible, DNS architecture, reverse proxies, certificate management — I can speak to all of these because I’ve actually run them, broken them, and fixed them.

If you’re preparing for a job interview or a certification, there’s no substitute. Talking through a lab scenario you actually built is infinitely more convincing than reciting theory. Recruiters and technical interviewers can tell the difference immediately.


It Creates Real Economic Value

This one surprises people, but the skills you develop in a homelab are directly marketable — and I’ve seen it happen firsthand with people I know.

Friends of mine who run homelabs have turned that knowledge into a genuine edge when working with small businesses and SMEs. Instead of recommending expensive proprietary solutions, they can deploy cost-effective, FOSS-based infrastructure that does the same job — sometimes better — at a fraction of the cost. A proper Proxmox cluster, self-hosted DNS, a WireGuard VPN, a mail stack, a reverse proxy with proper TLS — all of this can be set up and maintained by someone with homelab experience, and smaller clients who can’t afford enterprise vendors are hungry for exactly that.

The homelab is where you build the muscle memory to do this confidently. You’ve already broken and fixed these things in your own environment. When a client’s server goes down at an inconvenient hour, you’re not googling basic commands — you’ve been there before.

It also flattens the playing field. A freelancer or small IT consultancy with deep FOSS knowledge and homelab-built skills can compete with providers that charge ten times as much, simply by doing more with less. That’s a real business advantage, and it starts at home.


You Take Back Control of Your Data

Every service you self-host is a service you’re no longer depending on someone else to run, someone else’s servers to store your data on, and someone else’s pricing to change on you.

I run my own media server, my own photo library, my own document storage, my own password manager, my own DNS with ad-blocking, my own NVR for home cameras. None of these depend on a subscription. None of them will disappear because a company decided to shut down or pivot. None of them are sending my family’s data to a third party.

That’s not paranoia — it’s just a reasonable preference for owning the things you use every day.


Home Automation Gets Genuinely Useful

A homelab gives you the infrastructure to run Home Assistant properly — not the dumbed-down cloud version, but a real local instance with full control. When you combine that with the rest of your stack, things get interesting.

My Home Assistant is aware of everything on my network. It manages my UPS systems, monitors my servers, sends me alerts when something goes offline, and can automatically restart services when they misbehave. When my NVR node was crashing, Home Assistant detected the ping loss and cut and restored power via a smart plug to bring it back — automatically, at 3am, without me touching anything.

But what makes Home Assistant particularly powerful is that it speaks the language of virtually every smart home vendor out there. Zigbee devices, Z-Wave, MQTT, Tuya, Google, Apple, IKEA, Sonoff, Shelly — it doesn’t matter who made it, Home Assistant can integrate it. That means you’re not locked into a single ecosystem, you’re not dependent on any vendor’s cloud staying alive, and you can mix and match whatever hardware makes sense for your budget.

The automation side has real, measurable impact too. Lights that turn off when no one is in the room, climate control that adjusts based on presence, appliances that only run during off-peak hours — these aren’t just conveniences, they add up to meaningful savings on your electricity bill over time. You build them yourself, you understand exactly how they work, and you can tune them to your household’s actual patterns rather than relying on whatever a vendor’s app decides is “smart.”

And like everything else in the homelab, Home Assistant is a marketable skill. Small businesses, restaurants, offices — anyone with smart devices and no IT support has a problem you can solve. Setting up and managing a local Home Assistant instance, integrating their existing hardware, building automations that actually work reliably — that’s a service people will pay for, and it’s something you learn by running it at home first.

That’s not magic. It’s what happens when you have a proper homelab and take the time to connect the pieces.


The Cost Is Lower Than You Think

You do not need a server rack and enterprise hardware to start. The most useful nodes in my homelab are HP mini PCs that cost under $100 used. They’re compact, quiet, energy-efficient, and more than capable of running a handful of VMs or containers.

The honest costs are: hardware (low, buy used), electricity (low, small machines sip power), and time (the real investment). The time pays back in skills, income potential, and services you’d otherwise be paying subscriptions for.

Start with one machine. Install Proxmox or just plain Debian. Run one service. Break it. Fix it. Add another. That’s the entire playbook.


Where to Start

If you’re new to this, the barrier is lower than ever:

  • Proxmox VE is free, installs on almost any x86 machine, and gives you a full hypervisor with a web UI. It’s where most serious homelabs begin.
  • Old mini PCs (HP EliteDesk, Dell OptiPlex, Lenovo ThinkCentre) are ideal starter hardware — small, cheap, low power.
  • Self-hosted services worth starting with: a DNS filter for ad-blocking, a reverse proxy for clean HTTPS access to your services, a self-hosted password manager, and a file sync solution.
  • The community around homelabs is genuinely helpful — Reddit’s r/homelab and r/selfhosted are full of people at every level. YouTube is also an incredible resource: channels like Christian Lempa, Techno Tim, DBTech, and Craft Computing cover everything from beginner setups to advanced configurations, all with real demos and honest explanations.
  • AI as your co-pilot — this is something I didn’t have when I started, and it changes the game completely. Before deploying anything, you can describe your idea to your AI of choice, walk through the architecture, catch the gotchas before they bite you, and get a second opinion on your approach. You’re not starting alone anymore. You can go from “I want to do X” to a working plan in minutes, then learn deeply as you actually build it.

The most important thing is to start. Don’t wait until you have the perfect hardware or the perfect plan. Stand something up, see what breaks, and go from there. The learning is in the doing.


The Honest Part

A homelab is not always fun. There are nights where something breaks at the wrong time, a service goes down that your household depends on, or a fix you were sure would work makes things worse. That’s part of it.

But those moments are also exactly why the homelab works as a learning environment. You’re motivated to fix it because you built it and you care about it. That motivation is the engine behind everything else.

I used to be a gamer. I still play occasionally — maybe five times a year — and I have nothing against it. But somewhere along the way I found that homelabing is more satisfying and enjoyable, honestly. There’s something about having fun while actually learning that hits differently. Every problem you solve, every service you deploy, every crash you diagnose and fix — it’s leveling up in real life. You’re not accumulating points in a game world, you’re accumulating skills and knowledge that carry over into everything you do professionally. That feeling is genuinely hard to replicate.

And then something interesting happens: you start sharing your services with friends and family. You give someone access to your media server, or set up your parents with a VPN, or share your media library with a relative. Without realizing it, you’ve become their service provider.

If what you provide is good, they’ll rely on it. And if they rely on it, they’ll complain when it breaks. That’s not a bad thing — it’s actually one of the best things that can happen to you. Suddenly you’re dealing with real users, real expectations, and real consequences for downtime. You start thinking about reliability, about backups, about graceful failure. You start solving problems that mirror exactly what happens in a professional environment, but in a context where the stakes are manageable and you have full control.

That combination — low stakes, real consequences, full ownership — is what makes a homelab irreplaceable as a learning environment. If you’ve been on the fence, consider this your push. Start small, break things, learn from it, and build something that’s genuinely yours.

Come to think about it, it is kind of fun.


The author runs a three-node Proxmox homelab in Panama, self-hosts most of his daily services, and has been building and breaking things at home for years.

Replacing ZFS pools with boot partitions (In Proxmox)

I’ve created this document in order to have a clear guide to replace boot disks in a ZFS pool for proxmox, basically because the one on their documentation was not completely clear for me.

Source documentation: https://pve.proxmox.com/wiki/ZFS_on_Linux

In my case I was dealing with a Raid1 ZFS pool, both with bootable drives.

I wasn’t aware these drives had 3 partitions, which I had to replicate to the new drive in order to perform the proper replacement.

We replicate these partitions with the following commands:

sgdisk <healthy bootable device> -R <new device>    -  (use /dev/diskname)

sgdisk -G <new device>  - (use /dev/diskname)

The the second command will make sure the new partitions that have been copied from the remaining surviving drive, have unique GUIDs, it’s a bad idea to have disks with cloned GUIDs.

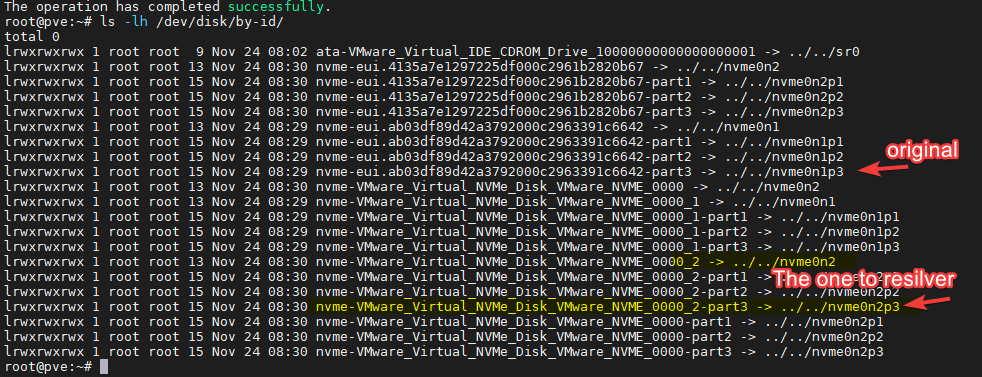
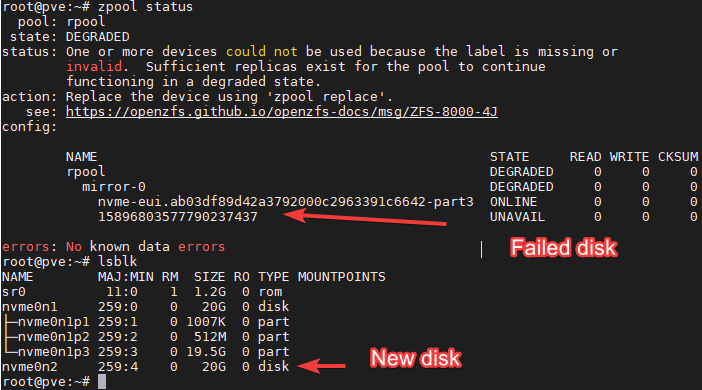
In the example above we see that Nvme0n1 is the remaining disk in the array, which is in good state.

Nvme0n2 is the new one, the one we are going to used to replace the failed one.

Knowing this we run the following commands:

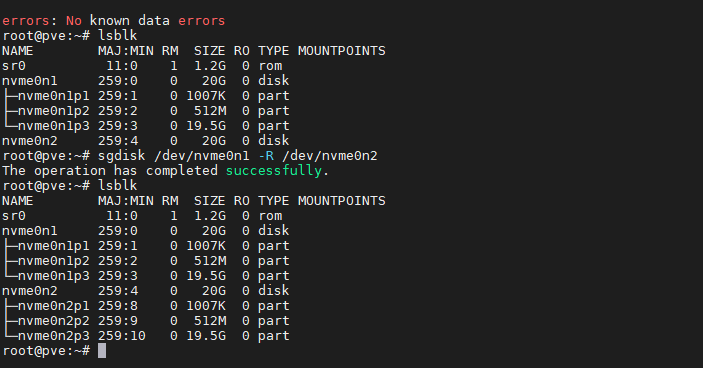
sgdisk /dev/nvme0n1 -R /dev/nvme0n2

sgdisk -G /dev/nvme0n2

The last command should output: The operation has completed successfully.

After, we should see the partitions replicated:

Now, we need to add the partition 3 to the ZFS pool array. Previously I made the mistake of adding the complete disk, which would destroy the partitions created and will not let you install the boot partition into the disk.

Avoid that mistake, what we need to add is the disk to the array, not the complete disk.

Lets move now to identify the partition ID we want to replicate:

ls -lh /dev/disk/by-id/

We know the new disk is the nvme0n2, and we know the partition is nvme0n2p3, so the ID we’ll use now its:

nvme-VMware_Virtual_NVMe_Disk_VMware_NVME_0000_2-part3

The command we need to now follow its:

# zpool replace -f <pool> <failed disk id> <new zfs partition>

From the first image in the document, we know the failed partition has this ID: 15896803577790237437

The resulting command should be:

zpool replace -f rpool 15896803577790237437 nvme-VMware_Virtual_NVMe_Disk_VMware_NVME_0000_2-part3

Do NOT do it like this:

zpool replace -f rpool 15896803577790237437 /dev/nvme0n2p3

The zpool replace command will start a resilvering process, which you should monitor until its 100% complete before moving forward.

We can monitor this process with the command:

watch zpool status -v

Once this process is completed, you can move on to install the boot files in the p2 partition for the drive

First we need to validate if we are using UEFI or GRUB with the following command:

proxmox-boot-tool status

You need to validate if the system says you are booting with legacy bios or UEFI.

# proxmox-boot-tool format <new disk's ESP>

In the example we are using, we know the boot partition should be /dev/nvme0n2p2, so following the example above the next command should be:

proxmox-boot-tool format /dev/nvme0n2p2

# proxmox-boot-tool init <new disk's ESP>  [grub] (optional)

After formatting the partition, we proceed to install the boot files, if we are using grub the command should be:

proxmox-boot-tool init /dev/nvme0n2p2 [grub]

If we are using UEFI, the command should be:

proxmox-boot-tool init /dev/nvme0n2p2

Then we proceed to clean the previous boot entries that are no longer relevant with the following command:

proxmox-boot-tool clean

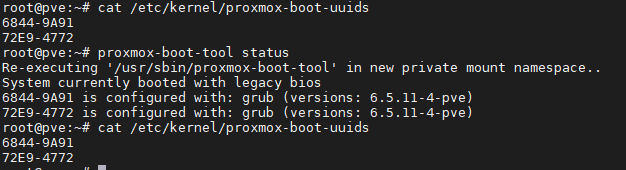
You can now proceed to validate if the boot partitions have been correctly installed with the following commands:

proxmox-boot-tool status

cat /etc/kernel/proxmox-boot-uuids

The output should look similar to this (Legacy Bios example)

Since this is a raid1 pool with 2 disk, we should only see two lines per output.

You should now be able to boot from both drives!

How to Create VLANs with MikroTik — The Easy Way

When you start working with MikroTik, VLANs can feel intimidating — especially if you’re coming from a Cisco background where the mental model is different. I’ve been there.

This post covers what I call the easy way: one bridge per VLAN. It’s not the most efficient method, and I wouldn’t recommend it for a production environment with many VLANs, but for a home lab or a small home network it works perfectly well and it’s straightforward to understand and troubleshoot. If you just want VLANs working without diving deep into MikroTik’s bridge VLAN filtering engine, this is your starting point.

A few things to keep in mind before we begin:

  • I’m demonstrating this in GNS3 with a MikroTik router connected to a Cisco switch, but the commands work the same on real hardware.
  • There’s no firewall or security configured in this lab — don’t apply this blindly to a production device without adding those first.
  • I’m assuming you have a basic familiarity with the MikroTik CLI and can relate the commands to the Winbox GUI.
  • We start from a clean slate with only a DHCP client on ether1.

The Lab Topology

In this scenario we have a MikroTik router connected to a Cisco switch via a trunk port. Three VLANs are configured, and devices on each VLAN can reach the internet and talk to each other through the router.


Why one bridge per VLAN?

MikroTik’s more advanced VLAN method uses a single bridge with VLAN filtering enabled — cleaner, more scalable, and better for CPU. The method in this post creates a separate bridge for each VLAN instead, which is simpler to visualize and configure but doesn’t scale well beyond a handful of VLANs. For a home lab with 3-4 VLANs, the difference is negligible.


Step 1 — Create the Trunk Bridge

Instead of attaching VLANs directly to a physical interface, I prefer to create a bridge for the trunk port. This gives you flexibility to add more trunk ports later without restructuring everything.

/interface bridge
add name=bridge-trunk

/interface bridge port
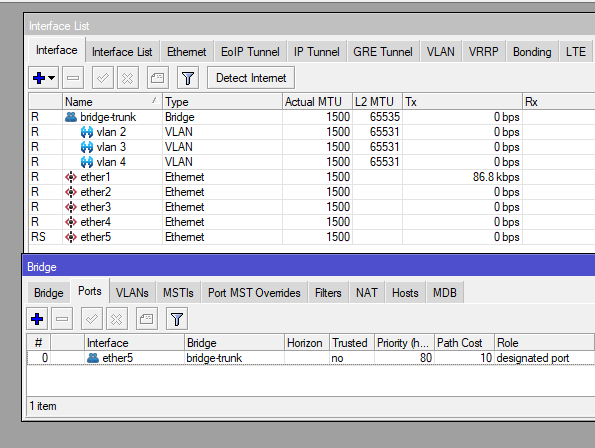
add bridge=bridge-trunk interface=ether5

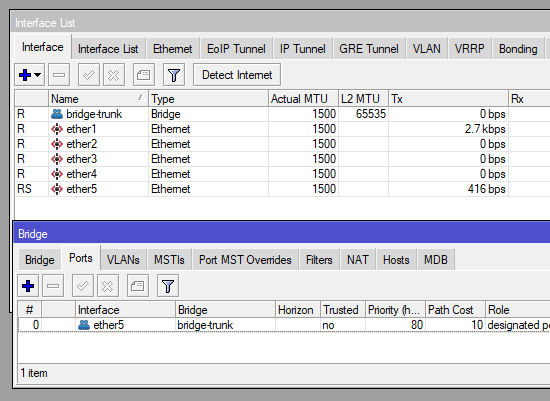
Here ether5 is the interface connected to the Cisco switch trunk port. After running this you should see the bridge and its port in Winbox: <img


Step 2 — Create the VLANs on the Trunk Bridge

Now we create the VLAN interfaces and attach them to bridge-trunk. This tells MikroTik to expect tagged traffic for these VLAN IDs on that bridge.

/interface vlan
add interface=bridge-trunk name="vlan-2" vlan-id=2
add interface=bridge-trunk name="vlan-3" vlan-id=3
add interface=bridge-trunk name="vlan-4" vlan-id=4


Step 3 — Create a Bridge for Each VLAN

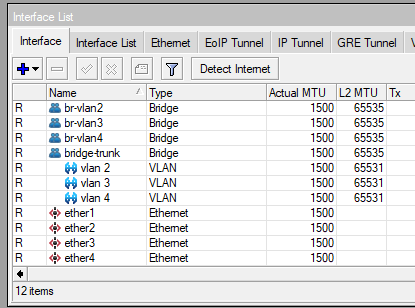
This is the “clunky” part. Each VLAN gets its own bridge. This bridge is what you’ll later attach access ports and IP addresses to.

/interface bridge
add name=br-vlan2
add name=br-vlan3
add name=br-vlan4


Step 4 — Attach VLAN Interfaces and Access Ports to Each Bridge

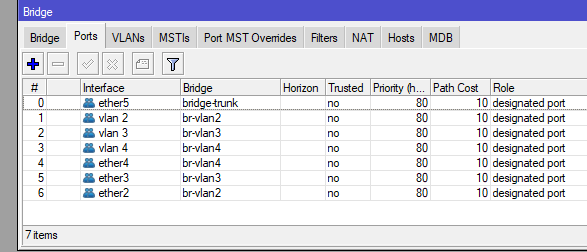
Now we tie everything together. Each VLAN interface goes into its corresponding bridge, and the access ports (the physical interfaces your end devices connect to) go into their respective bridges as well.

/interface bridge port
add bridge=br-vlan2 interface="vlan-2"
add bridge=br-vlan3 interface="vlan-3"
add bridge=br-vlan4 interface="vlan-4"
add bridge=br-vlan4 interface=ether4
add bridge=br-vlan3 interface=ether3
add bridge=br-vlan2 interface=ether2

At this point the trunk and access ports are working at Layer 2. Devices on the same VLAN can reach each other. To get IP addressing, DHCP, and internet access working we need a few more steps.


Step 5 — Assign IPs, Configure DHCP, and Set Up NAT

Each VLAN bridge gets an IP address (this becomes the default gateway for devices on that VLAN), a DHCP pool, and a DHCP server. We also configure NAT so all VLANs can reach the internet.

/ip address
add address=10.0.2.1/24 interface=br-vlan2 network=10.0.2.0
add address=10.0.3.1/24 interface=br-vlan3 network=10.0.3.0
add address=10.0.4.1/24 interface=br-vlan4 network=10.0.4.0

/ip pool
add name=dhcp_pool0 ranges=10.0.2.2-10.0.2.254
add name=dhcp_pool1 ranges=10.0.3.2-10.0.3.254
add name=dhcp_pool2 ranges=10.0.4.2-10.0.4.254

/ip dhcp-server
add address-pool=dhcp_pool0 disabled=no interface=br-vlan2 name=dhcp1
add address-pool=dhcp_pool1 disabled=no interface=br-vlan3 name=dhcp2
add address-pool=dhcp_pool2 disabled=no interface=br-vlan4 name=dhcp3

/ip dhcp-client
add disabled=no interface=ether1

/ip dhcp-server network
add address=10.0.2.0/24 dns-server=10.0.2.1 gateway=10.0.2.1
add address=10.0.3.0/24 dns-server=10.0.3.1 gateway=10.0.3.1
add address=10.0.4.0/24 dns-server=10.0.4.1 gateway=10.0.4.1

/ip dns
set allow-remote-requests=yes

/ip firewall nat
add action=masquerade chain=srcnat

Result

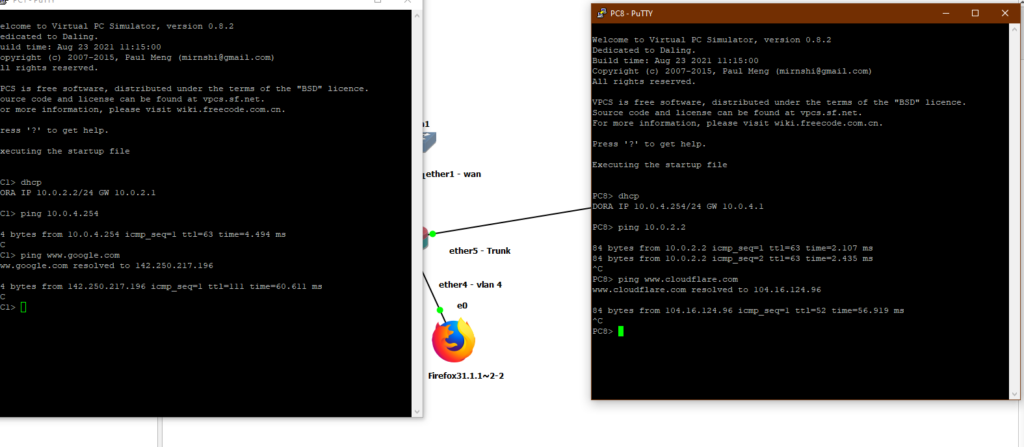
With everything in place, devices on different VLANs can communicate through the router and reach the internet — as shown here with PC1 and PC8 on opposite ends of the topology on different VLANs:


Config Files

If you want to study the full configuration or follow along in your own lab, here are the config files used in this post:

If you’d like the GNS3 lab file, send me an email and I’ll share it.


When to Use This Method — And When to Move On

If you’ve never configured VLANs before, or you’ve never done it on MikroTik specifically, this is a great way to get your feet wet. The structure is visible and tangible — you can see every bridge, every VLAN interface, every port assignment in Winbox. That transparency makes it easier to understand what’s actually happening at each layer, which is valuable when you’re learning.

That said, you should make an effort to learn the proper way once this clicks. Here’s why:

Performance. The easy way does all VLAN tagging and untagging in software on the CPU. Every packet that crosses a VLAN boundary goes through RouterOS’s bridge code. On a busy network or a router handling many VLANs, this adds up. The proper method — bridge VLAN filtering — is more efficient because there’s only one bridge in the kernel’s forwarding path instead of one per VLAN. On hardware with a built-in switch chip it can offload VLAN handling entirely to hardware, barely touching the CPU at all.

Management. The easy way grows linearly and messily. Five VLANs means five extra bridges, five VLAN interfaces, and five sets of bridge port assignments on top of your trunk bridge. Your interface list becomes a wall of entries and finding things in Winbox gets tedious. With bridge VLAN filtering, everything lives in one bridge. The VLAN table is a single clean list, and adding a new VLAN is a one-liner instead of three commands and a new bridge.

Troubleshooting. When something breaks with the easy way, you’re tracing traffic across multiple bridges. With a single bridge there’s one place to look — the bridge VLAN table and its port assignments.

The honest caveat: for a home lab with three or four VLANs and normal traffic levels, the performance difference is genuinely invisible. The management argument is the stronger one — this approach just gets unwieldy as you grow. Start here if you need to, but treat it as a stepping stone rather than a destination.