Frigate NVR on an HP EliteDesk G3 Mini with an i5-6500: Crashes, Workarounds, and an Unexpected Fix

How migrating from Linux Mint to headless Proxmox accidentally solved a problem I thought was unsolvable


If you run Frigate NVR on older Intel hardware, you may have noticed that “working” and “stable” are two very different things. This is the story of how an HP EliteDesk Mini G3 with an i5-6500 (Skylake) went from crashing multiple times a day to running for days without incident — and why I can’t fully explain why.


The Setup

The goal was simple: a dedicated, low-power NVR box for Frigate with five cameras, hardware-accelerated decoding via Intel VAAPI, and the OpenVINO detector for object detection. The hardware was an HP EliteDesk Mini G3 — compact, fanless, sips power. The original OS was Linux Mint, kept around from a previous life as a desktop machine.

Frigate ran in a Docker container directly on Linux Mint — no virtualization layer, just Docker on a desktop OS. VAAPI worked. Detection worked. The preview timeline ribbon worked. Everything looked fine — until the crashes started.


The Problem: i915 Instability Under Load

The Skylake iGPU (Intel HD 530) has a known relationship with the i915 kernel driver that ranges from “fine” to “spectacular failure” depending on workload, kernel version, and what feels like the phase of the moon.

Under sustained VAAPI decode load — which is exactly what Frigate does, continuously, for every camera stream — the i915 driver on Skylake is prone to GPU hangs. The symptoms look like this in the kernel log:

i915 0000:00:02.0: [drm] GPU HANG: ecode 9:1:85dffffb
i915 0000:00:02.0: [drm] Resetting chip for stopped heartbeat on rcs0

After a hang, the driver attempts a GPU reset. Sometimes it recovers. Often it doesn’t — and when it doesn’t, Frigate loses its decoder, Docker becomes unresponsive, and eventually the entire node needs a reboot.

At its worst, the box was crashing every few hours. Uptime above 12 hours was rare.


Living With It: The Workarounds on Linux Mint

With the crashes confirmed as an i915 problem under sustained VAAPI load, the options on Linux Mint were limited.

Reducing detection frames: Lowering the number of frames Frigate passed to the GPU for detection (down to 2) helped reduce the frequency of hangs. It didn’t eliminate them, but it bought more time between crashes. This setting was carried over to the Proxmox setup and is still in place today. Not a fix — just turning down the pressure on a leaking pipe.

The HA watchdog: The real mitigation was a Home Assistant automation. Since the entire node would become unresponsive — not just Frigate — I set up a ping monitor in Home Assistant that continuously checked whether the box was reachable. When it stopped responding, an automation would cut power via a smart plug and turn it back on. The box would reboot, Frigate would come back up, and the cameras would be live again within a few minutes.

But here’s the part that made this setup genuinely frustrating: opening the Frigate web UI to actually watch the cameras would trigger a crash after a few minutes. When you open the live view, Frigate starts encoding additional frames to serve the stream — that extra GPU encode load was enough to push the i915 driver over the edge. The system that was supposed to let me monitor my home would reliably crash within minutes of me trying to use it for exactly that purpose. The watchdog would kick in, the box would reboot, and I’d be back to square one.

That’s not a workaround. That’s a system that works only when nobody is looking at it.


The Unexpected Fix: Remove the Desktop

The original setup was Linux Mint installed on an SSD, with Frigate recording to an external USB hard drive. It worked, but it was a general-purpose desktop OS running a 24/7 surveillance workload — with a display manager, compositor, and GUI login screen all sitting idle, consuming resources and sharing the i915 driver with Frigate.

The real reason to move to Proxmox was operational: cluster membership for centralized management and backups. The plan was always to wipe Linux Mint and install headless Proxmox regardless of whether it helped Frigate. The stability improvement was not the goal — it was a side effect.

After the migration:

  • Linux Mint replaced with bare Proxmox 9, no desktop environment, installed on the NVMe
  • Frigate moved from Docker-on-Mint into a privileged LXC (Debian 13 minimal), with Docker still running inside it
  • LXC root disk on the SSD, /dev/dri/renderD128 passed through for VAAPI
  • External HDD mounted on the Proxmox host, path bind-mounted into the LXC for recordings
  • Same Frigate config, same cameras, same OpenVINO detector
  • HA watchdog kept in place as a safety net

Uptime went from under 12 hours to multiple days. Then a week. As far as I can tell, the watchdog hasn’t fired once since.


Why Did It Work? (I’m Not Sure)

Here’s where I have to be honest: I can’t definitively explain the improvement. A few theories:

The compositor theory. Linux Mint’s desktop compositor (Muffin) was actively using the iGPU for display rendering, even with no monitor connected. Removing it likely gave the i915 driver a much quieter workload outside of Frigate’s decode jobs — and the GPU does seem to be working noticeably less hard now. Less driver state to manage, fewer context switches, less contention. This feels like the most plausible explanation, but it’s still a guess.

There’s also circumstantial evidence that supports it: while Frigate was running on Linux Mint, the desktop itself became basically unusable — sluggish, unstable, barely responsive. The box was supposed to be headless at that point anyway, but the fact that the whole desktop environment degraded under Frigate’s load suggests the GPU was genuinely being overworked — pulled in two directions at once.

The kernel theory. Linux Mint ships a recent upstream kernel. Proxmox ships a more conservatively patched kernel tuned for server workloads. It’s possible the Proxmox kernel has better i915 scheduling or fewer regressions on Skylake specifically.

The “just less stuff running” theory. A minimal headless Proxmox install has dramatically less userspace touching the GPU than a full desktop OS. Fewer background processes, no screensaver, no hardware acceleration in a browser nobody’s using.

The “it was always going to be fine, I just didn’t know” theory. Maybe the instability was already improving and the timing was coincidental.

I genuinely don’t know which of these is the real answer — or whether it’s all of them together.

In hindsight, maybe I should have known better than to provision Frigate on a desktop OS in the first place. And maybe I should have anticipated that something as GPU-heavy as continuous VAAPI decode across five camera streams wasn’t a great fit for hardware that was already doing double duty as a daily driver. But I love Linux Mint — it’s still my daily driver on my main machine — and at the time it was the path of least resistance. Sometimes you learn the hard way.


Current State

The box has been running stable since the migration. The HA watchdog is still configured because there’s no reason to remove it, but as far as I can tell it hasn’t fired once since the migration.

Frigate performs exactly as it did before: VAAPI hardware decode for all five streams, OpenVINO for object detection, the preview timeline ribbon intact. The user experience is unchanged. The operational experience is dramatically better.


What I’d Love to Know

If you’ve run Frigate (or any VAAPI workload) on Skylake hardware and have dug deeper into the i915 instability, I’d genuinely like to hear what you found. Specifically:

  • Did removing a desktop environment make a difference in your case?
  • Have you found specific kernel parameters or i915 module options that improve stability under sustained decode load?
  • Is there a known-good kernel version for Skylake + VAAPI that I should be pinned to?

The crash is gone for now. But “gone” and “understood” aren’t the same thing — and the next person to hit this problem deserves a better answer than “try running it headless and see what happens.”


Hardware: HP EliteDesk Mini G3, Intel i5-6500 (Skylake), Intel HD 530. Running Proxmox VE 9 with a privileged Debian 13 LXC, Frigate via Docker, VAAPI via /dev/dri/renderD128 passthrough.
Building a Proxmox Home Cluster Without Shared Storage, HA, or Quorum Worries

A practical guide to clustering heterogeneous homelab nodes the right way


If you’ve been running multiple Proxmox nodes as independent standalone hosts and decided to bring them together into a single cluster, you probably hit the same wall I did: most of the clustering documentation assumes you have enterprise-grade shared storage, fencing devices, and a dedicated cluster network. In a homelab, you have none of that — and if you proceed naively, you end up with a cluster that’s more fragile than your original standalone setup.

This post documents the challenges I faced when clustering three heterogeneous nodes and how I solved each one.


The Setup

Three nodes, all running Proxmox VE 9, each with its own local storage:

  • A lightweight mini PC running 24/7, designated as cluster master
  • A heavier compute node with more RAM and storage, used for demanding workloads
  • A third mini PC running a specific NVR workload

None of the nodes share a storage pool. Each has its own NVMe SSDs, HDDs, and LVM-thin pools. No SAN, no Ceph, no NFS for VM disk storage — just local disks.

The goal was simple: a single Proxmox UI to manage everything, with each node remaining fully independent and capable of booting its VMs regardless of whether the other nodes were reachable.


Challenge 1: Hostname and DNS Consistency

Before even thinking about pvecm create, Proxmox requires that all nodes can resolve each other by FQDN. Corosync and the cluster filesystem (pmxcfs) depend on it.

In my case, two nodes had their search domain set to local.homelab.net while the third was still on the old homelab.net. The result: hostname --fqdn returned different domains across nodes, which would cause cluster communication issues down the line.

The fix: Standardize all nodes to the same search domain before touching anything cluster-related. On Proxmox, don’t edit /etc/resolv.conf directly — it can be overwritten. Use the PVE API instead:

pvesh set /nodes/<nodename>/dns --search local.homelab.net

Verify with:

hostname --fqdn

All three nodes should return <nodename>.local.homelab.net before proceeding.


Challenge 2: The Quorum Problem for Standalone Nodes

This is the big one, and it catches most homelab admins off guard.

Proxmox clusters use Corosync for node heartbeating and quorum to determine cluster health. The default behavior: if a node loses quorum (can’t reach enough peers), Proxmox freezes VM operations on that node. It won’t start VMs, it won’t stop them gracefully — everything just hangs.

Quorum fencing exists for a good reason in enterprise environments: if two nodes can both write to the same shared disk simultaneously, you get catastrophic data corruption. Quorum prevents this by shutting down the “minority” side.

But here’s the thing — if you have no shared storage, there is no shared disk to corrupt. Each node only touches its own local disks. Quorum fencing in this scenario provides zero protection and causes real pain: if your cluster master goes offline for maintenance, your other two nodes refuse to start VMs until it comes back.

The fix: Set no_quorum_policy: ignore in Corosync configuration. This tells the cluster to keep running VM operations even when quorum is lost.

After creating the cluster, edit /etc/pve/corosync.conf and add it to the quorum section:

quorum {
  provider: corosync_votequorum
  expected_votes: 3
  no_quorum_policy: ignore
}

With this in place, each node operates independently even if its peers are unreachable. You get the unified management UI when everything is up, and you get resilience when things are down.


Challenge 3: Ghost Disks — The Silent Disaster

When nodes join a cluster, Proxmox replicates storage.cfg cluster-wide. This means every node suddenly “sees” the storage pools defined on all other nodes — including local LVM-thin pools that physically only exist on one machine.

The result: a node will happily display another node’s local storage as “available,” and if you accidentally provision a VM disk there, it will fail silently or corrupt. Even worse, Proxmox’s UI won’t clearly warn you that you’re trying to use storage that doesn’t exist locally.

This is the ghost disk problem.

The fix: Use the nodes= directive in storage.cfg to restrict each storage pool to only the node it physically lives on.

Example storage.cfg:

lvmthin: fast-nvme
    thinpool fast-nvme
    vgname fast-nvme
    content rootdir,images
    nodes node1

lvmthin: secondary-ssd
    thinpool secondary-ssd
    vgname secondary-ssd
    content rootdir,images
    nodes node2

lvmthin: nvr-storage
    thinpool nvr-storage
    vgname nvr-storage
    content rootdir,images
    nodes node3

The nodes= line means that storage only appears in the UI when you’re looking at the correct node. No cross-contamination, no ghost disks.

Important: storage.cfg is cluster-wide and lives in /etc/pve/. Any node can modify it, but changes replicate everywhere. Edit it once after all nodes have joined — not before, because a node join overwrites the local storage.cfg with the master’s copy.


Challenge 4: VMs Vanish From the UI After Joining

Storage was fixed, the cluster was up, all three nodes were showing green. Then I noticed something alarming: the VMs and containers on two of the three nodes had completely disappeared from the Proxmox web UI — not stopped, not errored, just gone. No entries at all under those nodes.

To be clear about what “disappeared” means here: the VMs were still running. Every service was reachable, every SSH session connected, every workload humming along normally. The problem was purely at the management layer — Proxmox itself had lost track that those VMs existed. You couldn’t start, stop, snapshot, or manage them through the UI or API. They were invisible to the cluster, but alive on the metal.

What happened: When a standalone node joins a cluster, Proxmox transitions its local filesystem to pmxcfs — the distributed cluster filesystem. As part of this transition, VM and container configuration files need to be migrated from the old standalone path into the new cluster-aware path at /etc/pve/nodes/<nodename>/qemu-server/. In my case, that migration silently failed on two of the three nodes. The config files weren’t in the old path, weren’t in the new path — they were nowhere on the live filesystem.

Checking both locations confirmed the worst:

ls /etc/pve/nodes/<nodename>/qemu-server/   # empty
ls /etc/pve/qemu-server/                    # empty

Where the configs actually were: Before completing the join, Proxmox automatically creates a compressed SQLite backup of the node’s cluster database at /var/lib/pve-cluster/backup/. The configs were in there — they just never made it out into the live filesystem.

The recovery process: extract the backup into a temporary SQLite database, query it for the config files, and write them directly into the correct cluster path.

# Load the backup into a temporary database
zcat /var/lib/pve-cluster/backup/config-<timestamp>.sql.gz | sqlite3 /tmp/node-restore.db

# Inspect the schema — it uses 'name', not 'path'
sqlite3 /tmp/node-restore.db "SELECT name FROM tree WHERE name LIKE '%.conf';"

# Restore each VM config to its correct cluster path
for vmid in 100 102 103 105; do
  sqlite3 /tmp/node-restore.db \
    "SELECT data FROM tree WHERE name='${vmid}.conf';" \
    > /etc/pve/nodes/<nodename>/qemu-server/${vmid}.conf
done

# For LXC containers, the path differs
for ctid in 300 301; do
  sqlite3 /tmp/node-restore.db \
    "SELECT data FROM tree WHERE name='${ctid}.conf';" \
    > /etc/pve/nodes/<nodename>/lxc/${ctid}.conf
done

After writing the configs, the VMs reappeared in the UI immediately — no restart required. pmxcfs picks up new files in real time.

The lesson: If VMs disappear from the UI after a node joins the cluster, don’t panic and don’t touch the running workloads. The data and the disks are fine. The configs are almost certainly in the SQLite backup. Check /var/lib/pve-cluster/backup/ first.


Challenge 5: Why I Deliberately Skipped HA

Proxmox’s High Availability feature is prominently visible in the UI, and it’s tempting to think “I have a cluster now, I should enable HA on my important VMs.” Resist this.

HA in Proxmox works by detecting that a node has gone offline and automatically restarting its VMs on a surviving node. This requires two things that a local-storage homelab doesn’t have: shared storage (so the surviving node can actually access the VM’s disk) and a fencing mechanism (a way to guarantee the original node is truly dead before another node starts the same VM, preventing two nodes from writing to the same disk simultaneously).

Without both of these, enabling HA causes more problems than it solves. If a node goes offline, the cluster will repeatedly attempt to migrate and restart the VM on another node — and repeatedly fail, because the disk isn’t there. The cluster enters a retry loop, the VM ends up in an undefined state, and you’re left untangling it manually.

The deliberate choice here is to simply not use HA at all. The cluster serves a different purpose in this setup: unified management, a single web UI, and consolidated monitoring. Each node is responsible for its own VMs. If a node goes down, its VMs go down with it — intentionally and cleanly, with no cluster intervention. That’s fine for a homelab. You know where your VMs live, you know how to bring them back, and you don’t need the cluster to second-guess you.


The Order of Operations

Getting the sequence right matters. Here’s what worked:

  1. Fix hostnames and DNS on all nodes first
  2. Back up each node’s storage.cfg before touching anything
  3. Rename/fix any storage pools that have naming conflicts between nodes
  4. Create the cluster on the master node (pvecm create)
  5. Immediately set no_quorum_policy: ignore in corosync.conf
  6. Join remaining nodes one at a time (pvecm add --force)
  7. After all nodes have joined, edit storage.cfg once to add nodes= restrictions to every local storage pool
  8. Verify in the UI that each node only shows its own storage
  9. If VMs are missing from the UI, recover configs from /var/lib/pve-cluster/backup/ — don’t touch the running workloads

End Result

After working through all of this, the outcome is exactly what a homelab cluster should be: a single pane of glass for managing all your nodes, with each one remaining fully autonomous. Any node can go down for maintenance, upgrades, or power savings without affecting the others. The UI shows everything in one place when nodes are reachable, and gracefully marks them offline when they’re not.

No shared storage required. No HA complexity. No quorum anxiety.

If your homelab nodes are heterogeneous machines with local-only storage, this approach is the right one — just make sure you address the gotchas before you start, not after.


Running Proxmox VE 9.x across all nodes. Commands and behavior may vary slightly on older versions.

Replacing ZFS pools with boot partitions (In Proxmox)

I’ve created this document in order to have a clear guide to replace boot disks in a ZFS pool for proxmox, basically because the one on their documentation was not completely clear for me.

Source documentation: https://pve.proxmox.com/wiki/ZFS_on_Linux

In my case I was dealing with a Raid1 ZFS pool, both with bootable drives.

I wasn’t aware these drives had 3 partitions, which I had to replicate to the new drive in order to perform the proper replacement.

We replicate these partitions with the following commands:

sgdisk <healthy bootable device> -R <new device>    -  (use /dev/diskname)

sgdisk -G <new device>  - (use /dev/diskname)

The the second command will make sure the new partitions that have been copied from the remaining surviving drive, have unique GUIDs, it’s a bad idea to have disks with cloned GUIDs.

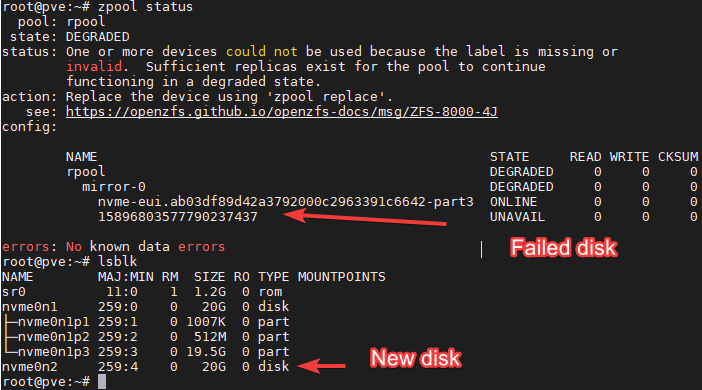
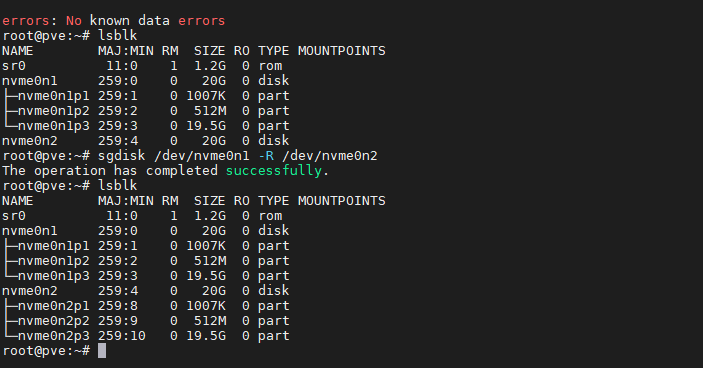
In the example above we see that Nvme0n1 is the remaining disk in the array, which is in good state.

Nvme0n2 is the new one, the one we are going to used to replace the failed one.

Knowing this we run the following commands:

sgdisk /dev/nvme0n1 -R /dev/nvme0n2

sgdisk -G /dev/nvme0n2

The last command should output: The operation has completed successfully.

After, we should see the partitions replicated:

Now, we need to add the partition 3 to the ZFS pool array. Previously I made the mistake of adding the complete disk, which would destroy the partitions created and will not let you install the boot partition into the disk.

Avoid that mistake, what we need to add is the disk to the array, not the complete disk.

Lets move now to identify the partition ID we want to replicate:

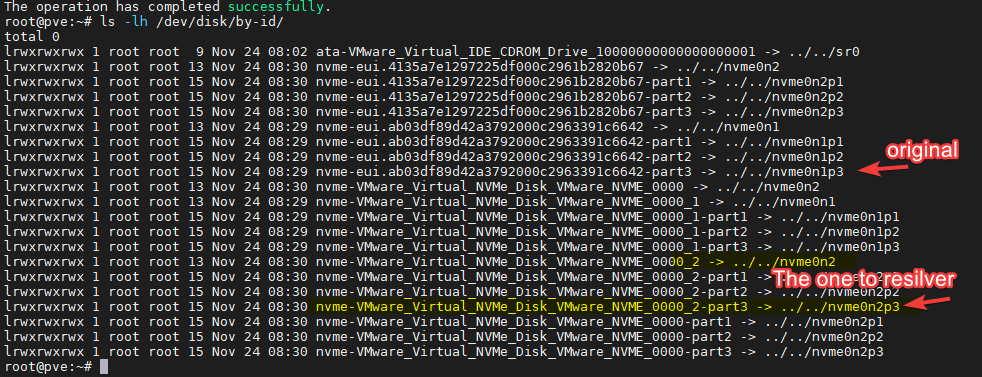
ls -lh /dev/disk/by-id/

We know the new disk is the nvme0n2, and we know the partition is nvme0n2p3, so the ID we’ll use now its:

nvme-VMware_Virtual_NVMe_Disk_VMware_NVME_0000_2-part3

The command we need to now follow its:

# zpool replace -f <pool> <failed disk id> <new zfs partition>

From the first image in the document, we know the failed partition has this ID: 15896803577790237437

The resulting command should be:

zpool replace -f rpool 15896803577790237437 nvme-VMware_Virtual_NVMe_Disk_VMware_NVME_0000_2-part3

Do NOT do it like this:

zpool replace -f rpool 15896803577790237437 /dev/nvme0n2p3

The zpool replace command will start a resilvering process, which you should monitor until its 100% complete before moving forward.

We can monitor this process with the command:

watch zpool status -v

Once this process is completed, you can move on to install the boot files in the p2 partition for the drive

First we need to validate if we are using UEFI or GRUB with the following command:

proxmox-boot-tool status

You need to validate if the system says you are booting with legacy bios or UEFI.

# proxmox-boot-tool format <new disk's ESP>

In the example we are using, we know the boot partition should be /dev/nvme0n2p2, so following the example above the next command should be:

proxmox-boot-tool format /dev/nvme0n2p2

# proxmox-boot-tool init <new disk's ESP>  [grub] (optional)

After formatting the partition, we proceed to install the boot files, if we are using grub the command should be:

proxmox-boot-tool init /dev/nvme0n2p2 [grub]

If we are using UEFI, the command should be:

proxmox-boot-tool init /dev/nvme0n2p2

Then we proceed to clean the previous boot entries that are no longer relevant with the following command:

proxmox-boot-tool clean

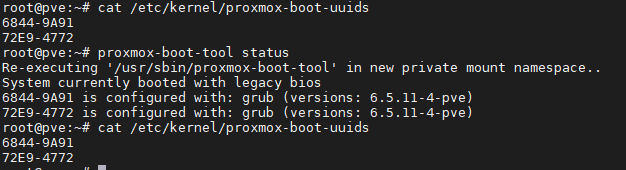
You can now proceed to validate if the boot partitions have been correctly installed with the following commands:

proxmox-boot-tool status

cat /etc/kernel/proxmox-boot-uuids

The output should look similar to this (Legacy Bios example)

Since this is a raid1 pool with 2 disk, we should only see two lines per output.

You should now be able to boot from both drives!