
Before beginning, It’s worth noting I’ve already flashed OpenWRT on my Xiaomi Gateway 3 (DGNWG05LM / ZHWG11LM)
I’m assuming you’ve flashed already OpenLumi on your gateway, if you haven’t, please follow the guides below to do it:
This is how you root it:
https://openlumi.github.io/gain_root.html
And this is how you flash OpenWRT on it:
https://openlumi.github.io/
Once your device is rooted, flashed with OpenWRT and you have ssh access to it, you’ll find your Xiaomi Gateway has become pretty useless unless you have an actual plan for it. (As it was my case)
In my case, I wanted to be able to push media files and TTS messages to the gateway using Home Assistant and Node-Red. I’ll try to explain the Node-Red part in a separate post, but for the time being, I’ll focus on the MPD Server setup.
A great part of what I’m doing is based on a guide I’ve found in Russian, but I’ve found it hard to understand so I thought it would be a good idea to write this one in another language.
After you’ve managed to gain root access, you need to begin by installing some packages on your gateway, to do this we will run on the terminal :
opkg update && opkg install node git-http mpg123 mpc mpd-full
Once you do, we need to create the files and directories for MPD to work, so go ahead and type in your gateway’s terminal:
cd /
mkdir mpd
cd mpd
mkdir music
mkdir playlists
touch database
touch log
touch /etc/mpd.state
Once you’ve done this, we will create the configuration file for MPD, to do this we will make the mpd.conf file on the /etc/
I’ve used “vi” for this, if you don’t know how to use vi to edit files, please check this out: https://www.redhat.com/sysadmin/introduction-vi-editor
This is how I did it:
I first created a backup of the original file and deleted the original one:
cp /etc/mpd.conf /etc/mpd.conf.bkp
rm /etc/mpd.conf
Then, I created my new mpd.conf file with the command:
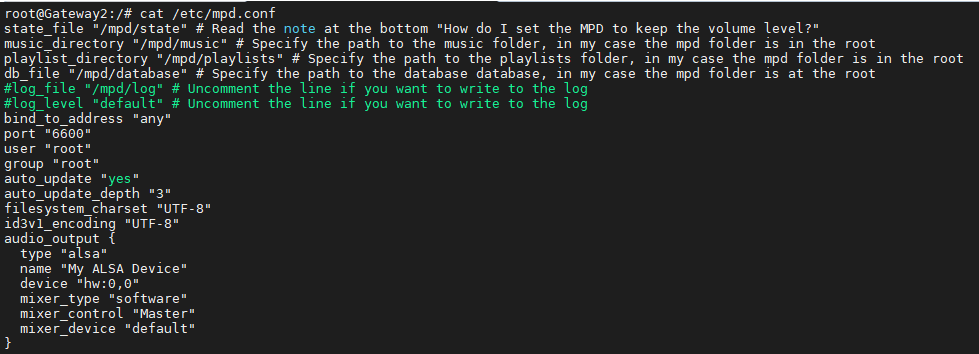
vi /etc/mpd.confOnce you’re ready to edit, you can go ahead and paste the following config info:
state_file "/mpd/state" # Read the note at the bottom "How do I set the MPD to keep the volume level?"
music_directory "/mpd/music" # Specify the path to the music folder, in my case the mpd folder is in the root
playlist_directory "/mpd/playlists" # Specify the path to the playlists folder, in my case the mpd folder is in the root
db_file "/mpd/database" # Specify the path to the database database, in my case the mpd folder is at the root
#log_file "/mpd/log" # Uncomment the line if you want to write to the log
#log_level "default" # Uncomment the line if you want to write to the log
bind_to_address "any"
port "6600"
user "root"
group "root"
auto_update "yes"
auto_update_depth "3"
filesystem_charset "UTF-8"
id3v1_encoding "UTF-8"
audio_output {
  type "alsa"
  name "My ALSA Device"
  device "hw:0,0"
  mixer_type "software"
  mixer_control "Master"
  mixer_device "default"
}
After saving it (Remember, to save on vi you need to type ESC and type :wq!, you can check the configuration by typing:
cat /etc/mpd.confAnd you should have something similar to this:
Then to apply the changes run:
/etc/init.d/mpd stop
/etc/init.d/mpd start
After this step, I’ve uploaded an mp3 file to the /mpd/music/ folder to test the functionality, for obvious reasons I can’t share that file, but we’ll call it doorbell.mp3, there are plenty of sites that offer these kinds of files for free.
Now to test if the MPD server is working you can download Auremo from this website:
https://code.google.com/archive/p/auremo/downloads
After installing Auremo, make sure you set it up using the IP of your MPD server (Your Gateway’s IP) to test its functionality, if you can see your mp3 file and you’re able to play it from your computer, you should be able to make it work on Home Assistant as well.
After that, you should be ready to use your MPD daemon on your home assistant as long as you configure the gateway on your configuration.yaml file, my configuration is similar to this:
media_player:
  - platform: mpd
    name: Xiaomi Lumi Gateway (Use whatever name makes you happy)
    host: 192.168.0.100 (Make sure you use the IP assigned to your gateway and you have a static ip)
    port: 6600
    scan_interval: 30
After this, restart Home Assistant.
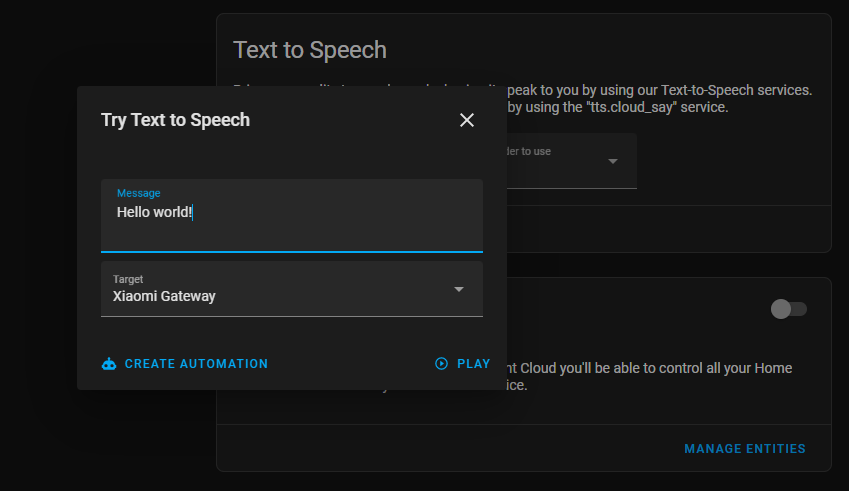
You should now be able to push TTS commands on your Home Assistant by going to:
Settings >> Home Assistant Cloud >> Text to Speech and clicking on “Try”
From there, select your newly added Xiaomi Lumi Gateway device and try to make it say a few things. 🙂
Right now, just like this, it’s ready for me to push commands, in my case I’ll use it with Node-Red to push alerts and voice commands.
I’ll be showing how I did this in a later post.